[PROTOCOL 001]: Part Cutting — The Safe Separation Protocol
[COMMAND OBJECTIVE] Obtain the parts safely
This protocol guides the Operator through the first phase of part cutting: Safely and quickly separating the main part body from the runner (sprue) using basic tools. The primary goal is to prevent irreversible stress damage and whitening on the part itself.
[TACTICAL GEAR VETTING] Recommended Tactical Gear
This basic protocol requires only the most common cutting tool.
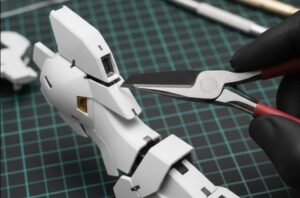
| Gear Name | Gear Image | Type | Core Function |
|---|---|---|---|
| Double Blade Nipper | 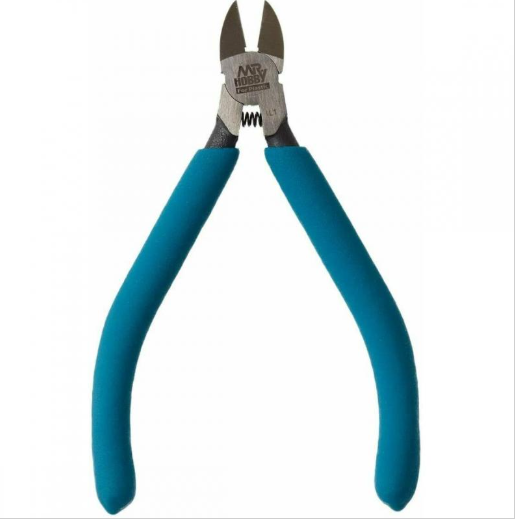 | Basic Cutter | Provides the necessary force for quickly “releasing” the part from the runner. |
Note: The Single Blade Nipper is an advanced tool for Gate Removal (Phase Two) and is not recommended for this coarse cutting stage, to avoid unnecessary damage to its delicate blade.
[PROTOCOL FLOW] The Safe Separation Procedure
The key to a safe cut is “Allowing for Excess.” Do not rush the process. Strictly follow this three-step procedure.
STEP 1: Target Acquisition and Tool Alignment
- Target Confirmation: Clearly identify the connection point between the part and the runner (the Gate).
- Tool Alignment: Position the double blade nipper, aiming the blades away from the part’s edge.
- Command: The cut must be made on the outer side of the gate connection, leaving an excess stub of at least $2 \text{mm} \sim 3 \text{mm}$ attached to the part.
STEP 2: Execute Initial Separation (Coarse Cut)
- Operation Command: Execute the cut with a smooth, decisive action.
- Result Verification: The part is now detached from the runner, but a noticeable Gate Stub (approx. $2 \text{mm}$ in length) remains attached to the part’s connection point.
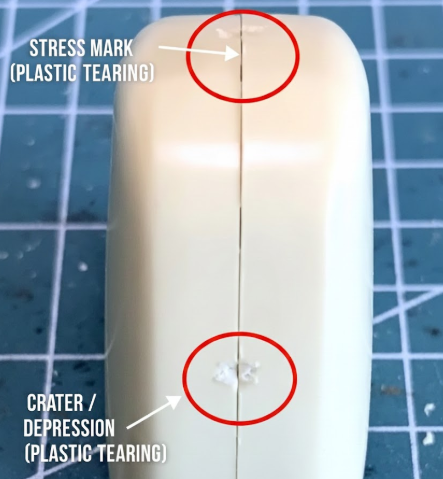
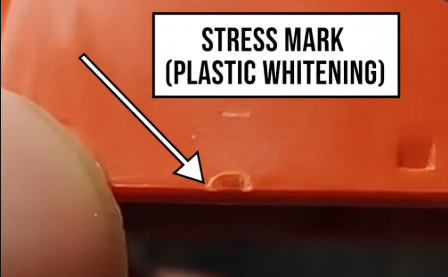
- Warning: Cutting flush against the part’s body in this step will generate immense stress, which is highly likely to cause irreversible whitening (stress marks) and complicate future processing.
STEP 3: Part Staging and Quarantine
- Safety Directive: Place the newly cut part into a clean organizing tray or storage box to prevent rolling, loss, or accidental damage.
- Protocol Link: The remaining Gate Stub is the “residue” of this protocol. It is designated as the primary target for the subsequent advanced protocol: Gate Removal.
[SAFETY GUIDELINES] Safety and Malfunction Alert
| Alert Signal | Root Cause Analysis | Immediate Correction |
| Hearing a Loud “Snap” Sound | Cutting point was too close to the main part, causing excessive shear stress. | Immediately stop and inspect the part for whitening or cracks. |
| Visible Crushing on the Cut Surface | The cutting tool blade may be dull or compromised. | Replace or clean the tool, ensuring the blade is sharp and flat. |
| Part Flies Out and is Lost | Failure to gently support the part with a finger or the non-cutting hand during the snip. | When cutting small parts, the part must be protected by a supporting finger to prevent it from launching away. |
The core of this protocol is Safety and Efficiency. By leaving an excess allowance, you have successfully protected the main body of the part from the damage of a coarse cut. Stage all cut parts for the next phase: [PROTOCOL 002]: Gate Removal — The Precision Cut Protocol, to achieve the Seamless Finish.
[END PROTOCOL 001]

![[PROTOCOL REPORT]: Deconstructing the Gunpla Phenomenon](https://plamoforge3d.com/wp-content/uploads/2025/12/wtsgunplaT-300x164.jpg)